

Introduction :
API Mesh is an API Broker service combining multiple APIs into one endpoint. The goal? Simplifying API-related works, decreasing the development time and improving user experience. API Mesh supports API management and gateway API IO, which is easy to use in the case of microservices architecture because it can also support duplicates for multiple languages.
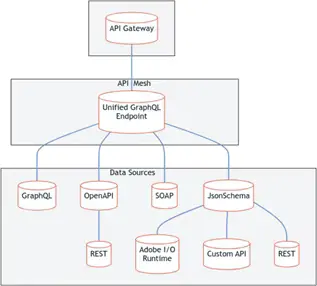
System Architecture
Adobe App Builder API Mesh is scalable, resilient, and flexible to help integrate APIs all over your organization. This article contains a brief overview of the parts that make up what it takes to get everything working.
Components :
- Client Application: Front-end app or service that communicates with the API Mesh. It might be a web app, mobile app, or any other service that needs to access multiple APIs.
- API Mesh Gateway: Single point of entry for all your API requests organization-wide. It is a utility gateway for routing to backend APIs and can change requests/responses.
- Resolvers: These functions handle incoming API requests and responses to ensure they are in the right shape. This allows you to transform requests so they will match the required backend API format and respond appropriately.
- Backend APIs: The real behind-the-scenes of API Mesh can be internal services, external third-party APIs, and any others needed by your system.
Workflow :
- Client —> API Mesh Gateway: The Client app sends a request to the gateway using REST APIs.
- Request Routing : The gateway sends the request to a proper resolver based on path and method.
- URL Rewriting : The resolver rewrites the requested URL to its specific backend API before it forwards a request. The backend API will process the request and return a response.
- Execution Responsiveness: The responses are aggregated and transformed as needed by the resolver before returning them to be procured again at API Mesh Gateway.
- This final response is sent to the client by the App Mesh API Gateway // Backend Response.
Getting Started
Prerequisites :
- An Adobe Developer Account
- Adobe I/O Console access
- Node.js and npm installed
- Some knowledge of RESTful APIs and JSON
Installation :
End Point: Sublime text writer in Adobe developer account if you don't have one already.
Build a new Adobe I/O project in the Adobe I/O Console.
Install CLI: Execute the command below to install Adobe I/O (Command Line Interface):
npm install -g @adobe/aio-cli
Configuration :
Authenticate with your Adobe account to log into the CLI:
aio auth login
Create a new project: Change directory to your project and run:
aio app init
Creating a Project
Step-by-Step Guide :
New Project: Log in to Adobe developer console, go to projects, and create a new project.
Add API Mesh: From your project, click 'Add API' and select the option to 'API Mesh'.
Attach Workspace to API Mesh: Select your project and add the service as API Mesh.
Configuring the API Mesh :
Now that we have included the API Mesh, let’s configure our prototyped application to consume it:
1. Create a mesh. Add a new file in the config folder (e.g., mesh.json) for your project.
2. Define APIs: Tell the mesh about which API you need to see in Mesh. This allows you to determine their endpoints, how request and response transforms are defined, and any helpers.
An example configuration :
{
"apiMesh": {
"services": [
{
"serviceName": "Service1",
"basePath": "/service1",
"endpoints": [
{ "path": "/endpoint1", "method": "GET", "resolver": "resolver1" },
{ "path": "/endpoint2", "method": "POST", "resolver": "resolver2" }
]
}
]
},
"resolvers": {
"resolver1": {
"type": "http",
"target": "https://api.service1.com/endpoint1",
"requestTransformation": {
"headers": { "Authorization": "Bearer " + this.sessionAccess.getToken() }
}
},
"responseTransformation": {
"data": {
"map": [{ "id": "identifier", "name": "fullName" }]
}
}
}
}
CLI Commands :
Login: aio auth login
Create a new project: aio app init
Add an API: aio app add API
Deploy the project: aio app deploy
Start the application locally: aio app run
API Overview
Key Concepts :
- API Mesh: Multiple APIs via a single endpoint.
- Resolvers: Describes how requests are going to be resolved or transformed.
- Schemas: Specify which data will be provided by each API.
Authentication
You will have to manage API keys and use OAuth2 for authorization. Formsuscita APIs are used from the public Internet or via VPNs. They may need different levels of security.
API Keys :
Generate an API key in the Adobe I/O Console and include it in your headers.
OAuth2 :
Implement secure authentication and token generation with Adobe’s OAuth2 Service.
Usage Examples
Basic Usage :
Example 1: Simple GET Request
curl -X GET "https://api-mesh.example.com/resource" -H "Authorization: Bearer {token}"
For a POST request :
$ curl -X POST "https://api-mesh.example.com/resource" --header "Authorization: Bearer {token}" --data '{"key": value }'
Error Handling
Common Errors :
- 401 Unauthorized: Your API key/token is not valid.
- 404 Not Found: The endpoint you requested doesn't exist.